Quick Answer: A shift is one loop: read your tasks, assign four crewmates to compartments on the duty roster, do your own minigame, work the sonar and route planner, then submit. Energy is per-crew and drains with assignments; Hull Integrity and Biohazard are the two ship-wide meters your tasks feed. The single most useful non-obvious thing on this page: the route planner rewards messy routes. Drawing lots of small direction changes gets you further than a clean straight line, and that is what gets people past the late sonar shift they think is broken. Budget three to five hours for a route.
Version note: Updated August 20, 2026 against Patch 1.0.1 (August 17). Mechanics come from official screenshots and the store page; the route-planner behaviour, the interaction quirks and the timings come from named player reports and developer replies on the Steam forums, linked inline. We have not completed every route and do not publish step-by-step story walkthroughs we have not verified.
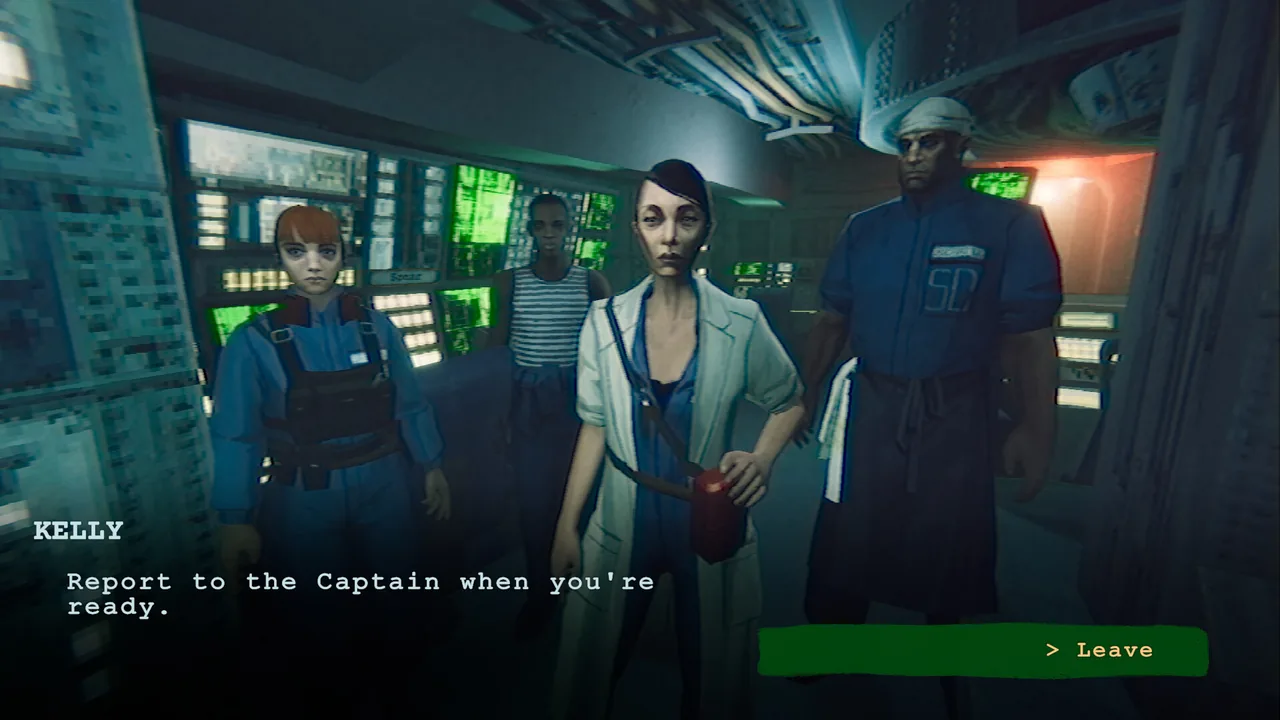 Your entire cast. The game is small enough that every crew member is load-bearing for both story and achievements. (Screenshot: solarsuit.games)
What Kind of Game This Is
Set expectations first, because this is where most of the disappointment in the reviews comes from.
It is a story game with a management layer, not a submarine simulator. You do not drive the Ares in any granular sense, you do not manage systems in depth, and the compartments are places to send people rather than machinery to operate. One negative review's phrasing is harsh but a fair warning: "mostly static assets masquerading as game systems."
The management layer front-loads. Several players report the crew assignment being genuinely interesting early and then mattering less — one puts the turn at "after the 5th shift." Do not build a strategy expecting the roster to stay the centre of the game; it hands off to the story.
The minigames are simple by design. Expect hold-a-key and fill-a-meter tasks. The hull repair task is the one players single out as tedious, and it is unavoidable — one player notes the route planner "was intentionally awful forcing you to do the hull repair task." It is also the one most often mistaken for a bug; the hull repair section below covers why.
The Duty Roster
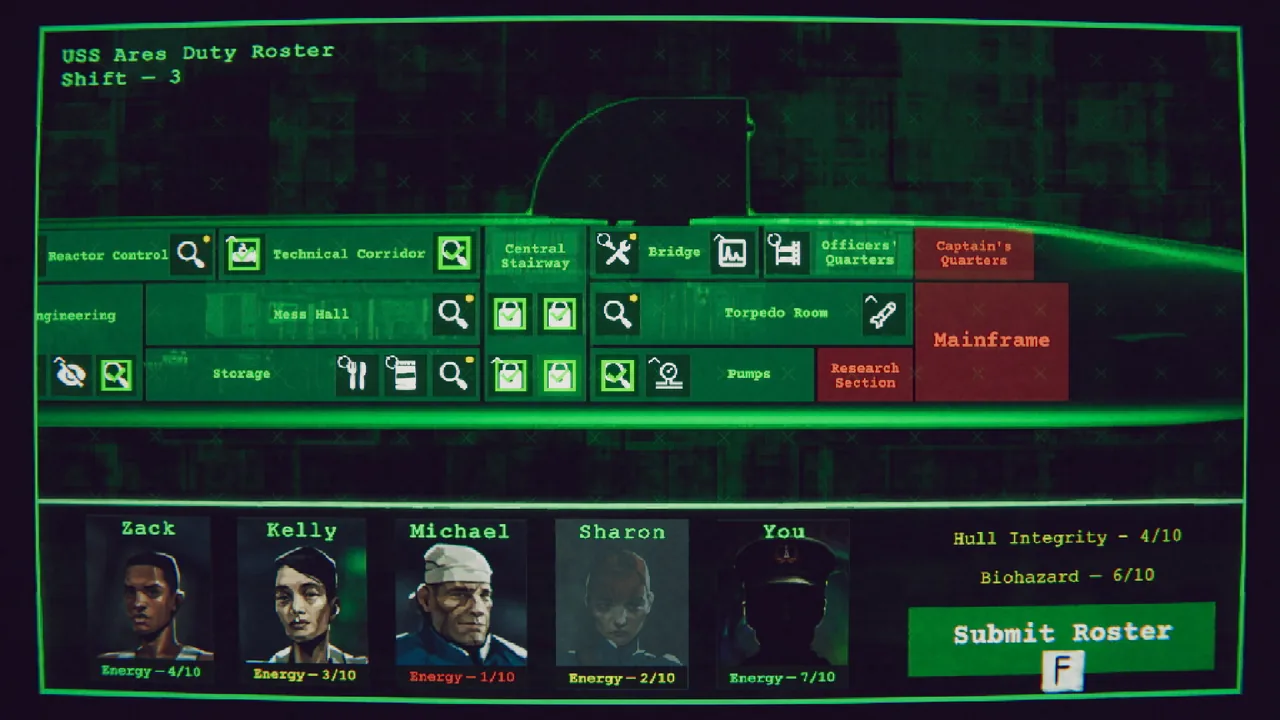 Shift 3. Michael's Energy is at 1/10 and shown in red; Captain's Quarters, Research Section and the Mainframe are locked. (Screenshot: solarsuit.games)
Everything you decide happens here.
Compartments run the length of the boat — Reactor Control, Technical Corridor, Central Stairway, Bridge, Officers' Quarters, Captain's Quarters, Engineering, Mess Hall, Torpedo Room, Storage, Pumps, Research Section and the Mainframe. Icons on each tile show what can be done there this shift: a magnifier for investigation, tools for repair, a knife-and-fork for cooking, a checklist for a completed assignment.
Red tiles are closed to you, not broken. On the shift above, that is the Captain's Quarters, the Research Section and the Mainframe. They open as the story opens them.
Energy sits under each crew portrait, out of 10, and turns red when it is low. Assignments spend it. Rest recovers it.
Two ship meters sit to the right: Hull Integrity and Biohazard, both out of 10. Your repair and containment work is what moves them.
Then you Submit Roster and the shift resolves.
One Thing Energy Does Not Do
Crew Energy does not limit how far the submarine can move. This is worth stating plainly because a player stuck near the end of the game assumed it did, and planned to reload an earlier save to let his crew rest. Another player corrected him — "Energy of crew shouldn't affect speed of boat" — and the real cause turned out to be the route planner. See below before you sacrifice a shift to resting.
The Route Planner: Draw a Messy Route
This is the most useful mechanical thing anyone has worked out about this game, and it is not in the tutorial.
A player who could not reach the objective zone on the final sonar shift — with two torpedo events that were supposed to have opened new paths, and no visible change to the map — solved it himself and posted the answer:
"I had to make very small movements resulting in a lot more 'pips' along my route and that for some reason gave me just enough movement to reach the green zone. If I tried to get to the zone in as few direction changes as possible and minimizing those pips I would run out of movement."
So: the number of direction changes you draw affects how far you get, and drawing efficiently costs you range. He is right that this is inconsistent and says so — "I feel like this should be adjusted for consistency or the tutorial changed to clarify" — and a second player in the thread reached the same conclusion independently: "definitely feels like there's something off about the maths for calculating route costs."
Three supporting facts from that thread, all of which remove reasons to panic:
- Yellow and orange are passable. Only red stops you. One player's summary: "You can move through yellow and orange, just not red. Every level the end can be reached without trouble."
- You do not have to clear obstacles to finish a shift. Another player reached the objective zone without torpedoing anything at all.
- Crew Energy is not the constraint. Covered above, and worth repeating because it is the wrong lever people reach for first.
Full treatment, including which obstacles torpedoes actually work on: Sonar & Route Planning.
Sonar
Sonar is how you identify what is out there before you commit to a route or a torpedo. The store page frames the ambiguity as the point: "Is it another submarine, or something alive?"
Not everything you can shoot is meant to be shot. Asked about this directly, a developer answered that some objects are simply resistant to torpedoes and others can be destroyed — so an obstacle surviving a hit is not a bug and not necessarily a sign you aimed wrong. Identify first, then decide.
Communicating via sonar for the first time is an achievement (Broken Phone, 45.9%), as is launching your first torpedo (Fire and Forget, 34.5%). Both arrive naturally.
Hull Repair: The Yellow Patches Are a Different Job
The minigame players call the worst in the game, and most of the frustration comes from one thing nobody explains: red growths and yellow patches are repaired with two different tools. Players get through the red, see yellow areas they cannot affect, and conclude the task is bugged or that they are locked out of the ship.
Red growths you remove. That part is discoverable.
Yellow patches you weld, and you have to find the crack first. Inside each yellow area there are cracks that read as white pixels. Put the soldering iron on those specifically — not on the yellow generally. This is the step that makes the task look broken, because sweeping the tool across a yellow patch does nothing at all.
Three things decide whether it registers:
- Magnetise yourself to the hull. Players describe this as the difference between the tool working and the tool doing nothing.
- Get closer than feels reasonable. One player's whole problem was distance — "the problem is I wasn't getting close enough to the hull. I have to practically smash my face into it." If the iron will not bite, close the gap before you assume you have the wrong spot.
- Move slowly. Going fast raises your noise level, and the noise level is what attracts attention out there. You will spend part of this task waiting for it to fall again, which is the reason it takes as long as it does.
Nothing here is optional or skippable, so treat the waiting as part of the task rather than a sign you are doing it wrong. Two of the players who worked this out call it the worst minigame in the game while explaining how to pass it, which is a fair summary of the consensus.
Cooking Faster
The galley minigame is the one people call tedious, and the developers explained why it drags for most players — the speed is under your control and nothing says so:
"Cooking speed depends on temperature — the bigger the red bar, the faster it cooks. But if the red bar reaches the end it starts to burn. So the most efficient and fastest way is to keep the red bar close to the end and flip / stir so it never quite gets there."
Rule: run it hot and stir to hold it there. The player who raised it had been keeping the bar low out of fear that filling it would fail the task, which is exactly the mistake that makes the minigame take twice as long.
Doors That Will Not Open Are Usually Not Bugs
Two interactions cause most of the "I am softlocked" threads, and the developer answered one of them directly.
Stiff hatches need repeated presses. A player blocked at the biohazard section — life support restored, hatch giving a turning animation but never opening — was told by the developer account solarsuit:
"Try pressing it multiple times — to open those hatches you need to apply force to the valve. Do it by hitting the button rapidly to open the door."
It worked, and the reporter's reply is the fair verdict: "You really need to make this a lot clearer in the game." Mash the key on any hatch that animates but does not open.
Some doors are timing, not permission. The coffee pot is once per shift, and the Captain will not always see you. Check your task list before you conclude the game has broken.
One exception, now patched. The day-4 case — no interact prompt on the Captain's Quarters, no coffee machine — was a real bug, caused by loading an autosave made during rest, and Patch 1.0.1 fixed it on August 17. Update before you troubleshoot. Details in Bugs & Fixes.
Reading Your Notes
Your crew will tell you that notes have been uploaded to the Mainframe, and you will go looking for somewhere to read them and not find it.
You are not missing a menu, and you should not restart over it. The developers confirmed the console is missing, and answered the obvious follow-up — whether to keep playing or wait:
"Everything you've opened is saved, so after that update you'll be able to load your last day during the Rest segment and read everything you and your crewmates collected."
So the log is being recorded invisibly. Keep a save on your last day and read it once the console ships. In the meantime the notes are readable from the mess hall — a player confirmed that, and flagged that they look important. Delivery status: Bugs & Fixes.
Choices, Flagged and Otherwise
The game marks its important decisions. Players notice this and are split on it — "it's clear when the important decisions pop up" from someone who liked it, and "the game basically tells you what choices are important which removes the actual fun in figuring out what you want to prioritize" from someone who did not.
Either way, the practical consequence is that you will not miss a branch by accident. The flagged decisions are the ones that steer your ending: whether you take the pills at night, how you answer the entity, and whether you join the mutiny. Full routes as players have posted them: All Endings.
First-Run Advice
- Save deliberately, and keep old saves. The recovery move for every genuine story break so far is loading a save from well before the problem — often further back than your last two. Captain's Report (91.7%) is just for saving once.
- Mash stiff hatches before you assume you are blocked.
- Draw wandering routes, not efficient ones.
- Do the two arcade achievements when you find the machines, not on a completion pass. One reviewer spent two of his five hours grinding the darts achievement at the end.
- Do not expect the roster to carry the whole game. Enjoy it while it is the focus and let the story take over.
- If your speech and subtitles disagree, trust the subtitles. That mismatch is a known defect, not a narrative device.